Monday, June 27, 2011

Dining Room Table Makeover


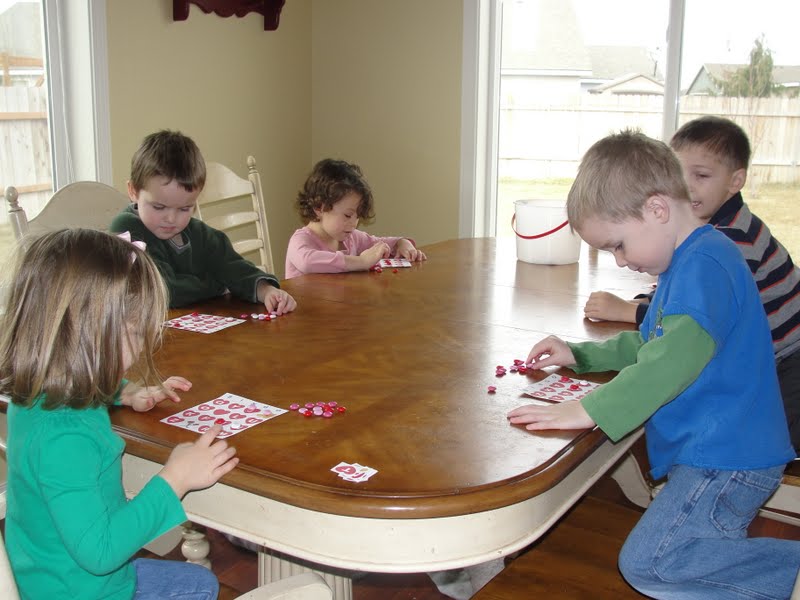
Here is what my dining room table looked like BEFORE. Sorry, it was the only recent picture I could find and it doesn't even do justice to how abused the top was. My kids have stabbed it with forks, drawn on it with permanent markers...you get the picture. I like distressed furniture, but this just looked ugly. I really wanted a white table to tie in the white from my family room curtains and rug. So I finally took the plunge and painted and antiqued it! I used a tutorial from the blog All Things Thrifty http://www.allthingsthrifty.com/2010/06/dining-room-table-transformation.html and it turned out just how I was hoping! I used more of a white paint than the one in her tutorial though.  I wanted the table to be smooth enough to wipe down and protected enough that it won't stain so I added 3-4 top coats (more for the top of the table and less for the chairs) of Deft Clear Wood Finish in "Gloss" which comes in spray cans. It worked great! Here's the finished product:


P.S. Don't mind the crumbs on the floor...we do actually use this room :-)

Sunday, June 26, 2011

I love me some vintage cars!

Our family of five has a tradition that brings both mine and my husband's hobbies together in one event. That event is a local, annual car show & parade. Now, I do not LOVE cars! And I don't love the kind of "muscle" cars that my husband adores. But I do longingly admire some of the beautiful vintage cars, especially those painted in turquoise, seafoam green, robin egg blue, red, etc. And so we are both satisfied as we gaze at each car passing by in the parade. And of course my kids love all the colors, noise, and candy! Here are some of my favorites from this year:


That's my cute 9-year-old daughter posing in front of one of her favorites!

Birthday Outing

Birthday Outing

My friend Valerie and I have birthdays just 2 days apart (plus or minus a few years). In past years we have celebrated together by getting pedicures, going out to eat, etc. This year was even better! We drove to 3 antique stores within 30-40 minutes from us and had a ball! I was actually pretty worn out by the last store but it was so incredible to see so many different vintage items in one afternoon! I would have grabbed up so much more than I did if I didn't have a budget!  Here's what I came away with:
 An old baby scale! It has the weight/age charts up to 18 months. So cute!

Retro still-working-but-very-dangerous fan. I love this color!

Valerie bought two different iron plant stands to decorate her porch/deck. They're going to be so cute when she gets plants on them!

We had planned on stopping somewhere for ice cream but weren't sure where when we happened upon a gift store that sold several types of gelato. Neither of us had tasted gelato before and we tried lots of samples before deciding on 2 flavors each. It was so yummy!


Thanks for the fun, fun day Valerie! I can't wait to see what we do next year!

Friday, June 24, 2011

Chocolate-Frosted Brownies


This recipe comes from my great-grandmother's original 1950Betty Crocker's Picture Cook Book. 


Chocolate-Frosted Brownies
Melt together over hot water...
     2 sq. unsweetened chocolate (2 oz.)
     1/3 cup shortening
Beat in...  
     1 cup sugar
     2 eggs
Sift together and stir in...
     3/4 cup sifted GOLD MEDAL Flour
     1/2 tsp. baking powder
     1/2 tsp. salt
Mix in...
     1/2 cup broken nuts
 Spread in well greased 8" square pan (8x8x2"). Bake until top has dull crust. A slight imprint will be left when top is touched lightly with finger. Cool slightly...then cut into squares.

Temperature: 350 (mod. oven).
Time: Bake 30 to 35 min.
Amount: 16 2" squares.


Marie's Chocolate Icing
Melt over hot water 1 tbsp. butter and 1 sq. unsweetened chocolate (1 oz.). Blend in 1 1/2 tbsp. warm water. Stir and beat in about 1 cup sifted confectioner's sugar (until icing will spread easily).


My Notes: The frosting makes the whole brownie! Seriously! I did not melt the chocolate for the brownies over hot water...I just microwaved it with the shortening (I used butter) for about 30 seconds at a time, stirring between heating. I also made sure I beat the eggs before adding them to the warm chocolate so they didn't turn into scrambled eggs. I did not add nuts because my hubby hates them in desserts!

Chocolate Chip Cookies


A classic recipe from the original 1950 Betty Crocker's Picture Cook Book

Chocolate Chip Cookies
The glamorous Toll House cookies...first introduced to American homemakers in 1939 through my series of radio talks on "Famous Foods from Famous Eating Places."

Mix together thoroughly...
     1/2 cup soft shortening (part butter)
     3/4 cup sugar (half brown, half white)
     1 egg
     1 tsp. vanilla
Sift together and stir in...
     1 1/8 cups sifted GOLD MEDAL Flour
     1/4 tsp. soda
     1/2 tsp. salt
Then mix into the dough...
      1/2 cup cut-up nuts 
     6-oz. package chocolate pieces (about 1 1/4 cups)
Drop rounded teaspoonfuls about 2" apart on lightly greased baking sheet. Bake until delicately browned...cookies should still be soft. Cool slightly...then remove from baking sheet.

Temperature: 375 (quick mod. oven).
Time: Bake 8 to 10 min.
Amount: About 3 doz. 2" cookies.

My Notes: A good recipe! It's basically the same as the recipe on the back of the Toll House chocolate chips bag but it has been cut down about 1/2. I did not use nuts due to my husband's preference :-)

Cinnamon Bread


 I have a little collection of vintage cookbooks I find at estate sales. This recipe comes from the Duncan Hines Adventures in Good Cooking--Tested Recipes of Unusual Dishes From America's Favorite Eating Places (Copyright 1951). It was contributed by Mrs. W. B. Taylor of Bowling Green, Kentucky. 


Cinnamon Bread
2 egg whites, beaten
1/2 cup milk
1/2 cup butter
1 cup sugar
2 egg yolks, beaten
1 1/4 cups cake flour
2 1/2 teaspoons baking powder
1 teaspoon cinnamon
1 tablespoon butter, melted

Mix together the egg whites and milk. In separate bowl, cream together the butter, sugar, and egg yolks. Add to the egg white mixture. Sift together the cake flour, baking powder, and cinnamon. Add to the wet mixture.

Bake in 300 F. oven for 30 minutes. When done pour melted butter over top and sprinkle with mixture of sugar and cinnamon.

My Notes: The recipe name is deceiving...this is more like a coffee cake than a bread, but it is delicious! I poured the batter into an 8x8 pan and ended up baking this for 45 minutes until a toothpick came out clean. I did not use cake flour, I just used all-purpose flour. I already have a mixture of cinnamon and sugar to put on cinnamon toast, so I simply sprinkled that on top of the melted butter after the cake was baked.

Orange Oatmeal Cookies


 This recipe comes from the 1953 edition of The Family Circle Cake & Cooky Cookbook. Notice the spelling of cooky. It seems that cooky was singular and cookies was used for more than one cooky!

Orange Oatmeal Cookies
1 cup sifted flour
1 cup sugar
2 teaspoons baking powder
1/2 teaspoon salt
1/2 teaspoon nutmeg
1/2 cup shortening
1 egg, unbeaten
Grated rind of 1 orange
2 tablespoons orange juice
1 1/2 cups quick-cooking rolled oats

1. Grease cooky sheets.
2. Measure flour, sugar, baking powder, salt, and nutmeg into sifter; sift into medium-size bowl.
3. Add shortening, egg, and orange rind and juice; beat with wooden spoon until smooth and well blended.
4. Blend in rolled oats (dough will be thick).
5. Drop dough by teaspoonfuls, about 3 inches apart, onto prepared cooky sheets.
6. Bake in moderate oven (375 degrees) 12 to 15 minutes, or until edges are lightly browned.
7. Run spatula under cookies; remove to wire cake racks; cool; store in airtight container to keep crisp.


My Notes: These cookies fill your home with a wonderful orange aroma while baking! I did not sift anything...I'm lazy like that :-) I also didn't use a wooden spoon like the recipe said to. I should probably try to do things like people did during the time period of the recipe, but my Kitchen Aid is so much easier! Also, for the orange juice I just squeezed out some juice from the orange after I grated the rind off of it.

Butterscotch Icebox Cookies


This recipe comes from an amusing book called Mama's in the Kitchen ~ Weird & Wonderful Home Cooking 1900-1950. Some of the recipes in this book are outrageous (and the author knows it) such as Sauerkraut Jell-O, Macaroni and Liver, and Spinach Ice Cream. The following recipe, however, is definitely a keeper! The original recipe was printed in the book G.E. Electric Refrigerator Recipes in 1927.

Butterscotch Icebox Cookies
1/2 cup butter
1 cup brown sugar
1 egg
1 tsp. vanilla
2 cups flour
1 tsp. baking powder
1/2 cup chopped nuts

Cream butter and sugar, add egg and vanilla and mix well. Mix baking powder with flour and add to creamed mixture. Stir in nuts. Roll in waxed paper and refrigerate until firm. Storing them in the freezer works well, too. (That wasn't an option with G.E.'s 1927 refrigerator.) Slice and bake 8 minutes or until lightly browned in a preheated 375 degree oven.

 This dough is much like sugar cookie dough. It was easy to form it into a log and roll it in wax paper.

 This is how thick I sliced the dough.

 Some of the slices didn't come out very round when I sliced them. I just molded them into circles with my hands.

My Notes: These were really easy to make and good too! My kids loved them and my husband said they tasted like Christmas. I thought they tasted very similar to sugar cookies, but with nuts and brown sugar added. I used pecans for the nuts but I'm sure walnuts almonds would be wonderful too. I cheated on the refrigerator part and only left them in about 20 minutes. It still worked :-) IMPORTANT: Remove these from the cookie sheet as soon as they are done (I cooked mine about 9 1/2 minutes) or the bottoms will brown and the cookies will lose their moistness. I learned this with my first batch.

Toffee Nut Bars


I recently purchased some cookbooks from 1939-1945. I LOVE that time period right before, during, and after World War II. I have plans to make & post some of their really exceptional-looking recipes, but today I was making a snack for my kids spur-of-the-moment so I had to deal with the ingredients I had on hand and a short time frame! These bars come from a really torn-up copy of Christmas Cookies by Wisconsin Gas & Electric Company. It seems that this utility company made a Christmas cookbook to send to its customers every year.

Toffee Nut Bars
Bottom Layer
1/2 cup butter
1/2 cup brown sugar
1 cup bread flour

1. Cream butter. Add brown sugar gradually. Blend thoroughly.
2. Add flour. Mix well.
3. Pat into 7 1/2 x 11 1/2 x 1 1/2 inch pan.
4. Bake at 350 degrees for about 10 minutes. Let cool slightly.

Top Layer
2 eggs
1 cup brown sugar
1 teaspoon vanilla
2 tablespoons bread flour
1 teaspoon baking powder
1/2 teaspoon salt
1 cup coconut
1 cup almonds, chopped

1. Beat eggs until light. Add brown sugar, and vanilla. Blend well.
2. Sift flour, baking powder, and salt together. Stir into creamed mixture. Mix until smooth.
3. Add coconut and chopped nuts.
4. Spread evenly over slightly cooled bottom layer.
5. Bake at 350 degrees for about 35 minutes.
6. When cooled, cut into bars.
7. Make 24 bars.

1st layer ready to be baked

This is the 2nd layer spread over the baked 1st layer

My Notes: This is a simple recipe even if it does have 2 layers...don't be afraid to try it!

I feel badly for anyone who doesn't like nuts (and coconut) and reads this blog because unfortunately for you there are so many vintage recipes that include them! There is the option of leaving nuts out of some recipes, but I think a recipe like this would not be what it was meant to be if you took out the coconut and nuts! 
I used my 9 x 13 pan which is a little bigger than the recipe calls for. I should have cut down the baking time because of this, but I only checked it 3 minutes before the timer went off so they turned out a little more golden than I would have liked. I would check these after 28 minutes.